Browsed by
Author: Meredith Mitchell

Fat Loss #3

Fat Loss #3

 Good Morning Everyone!

Ghrelin is the third and last hormone I am going to talk about in the Fat Loss series.  It is best known as the “hunger hormone”.  Produced mainly in the stomach, Ghrelin stimulates your appetite when your body is hungry and promotes the accumulation of fat in the abdominal area which can be the most harmful.  Ghrelin is released right before a meal time when your body needs food/energy.  Levels of Ghrelin are lower in obese individuals however, when you start your journey towards losing weight and create a calorie deficit, Ghrelin levels increase when the calories you consume are less than what your body is used to. Unfortunately, this can make it very challenging to stick to a decreased caloric intake because you feel hungry.

There are things you can do to help suppress your Ghrelin levels so that when you create a calorie deficit, this hunger hormone won’t control you 🙂.  Here’s how:

  • Eat protein with every meal


  • Eat 3-4 times a day…Some are satisfied with eating 3, 500-700 calorie meals and others do better with 4 smaller meals.  Do what works best for you.


  • Drink 6-8oz of water before every meal


  • Get a good night’s sleep…7 hours is best
  • Lower your stress level or make sure you have a stress release. Allowing your stress levels to stay high for an extended period of time with no release, can increase your Ghrelin levels.

If you’re interested in learning more about Ghrelin, read the articles below:

http://www.momtastic.com/health/380889-ghrelin-the-hormone-that-makes-you-eat-and-keep-eating/

http://www.yourhormones.info/hormones/ghrelin.aspx

In the last 3 Fat Loss emails you will learn about some of the most effective ways to keep your hormones balanced so you can increase your fat loss potential!

Email me with any questions 🙂

Yours in Health and Wellness,

Meredith


Push-Up and Activity Challenge

Push-Up and Activity Challenge


Good Afternoon Everyone!

Here are the details for the Push-up Challenge and the Activity Challenge!  Both Challenges will start on Monday June, 2nd 2014 and end on Friday August, 1st 2014.

Push-up Challenge

The challenge will be split up into two groups, men and women.  A $50 gift card will be awarded to the man who does the most push-ups without resting and the woman who does the most push-ups without resting.  There will also be a $20 gift card awarded to the Most Improved participant.  If you would like to participate in the challenge, email me by Monday June, 2nd with the max number of push-ups you were able to complete without resting.  

How to do a Push-Up

https://www.youtube.com/watch?v=zF0jbubK_jU

The video above shows the proper form of a push-up done on your toes.  If you are a beginner, you will follow the same instructions only you will be on your knees.  The other modification for a push-up if you have a hard time completing one on your knees is a wall push-up.  Watch the video below for instruction.

https://www.youtube.com/watch?v=a6YHbXD2XlU

For the challenge day, your push-ups must be completed on your toes.  Now don’t count yourself out if you’re only capable of doing your push-ups on the wall.  Stay consistent with your push-ups and you WILL get stronger 🙂.

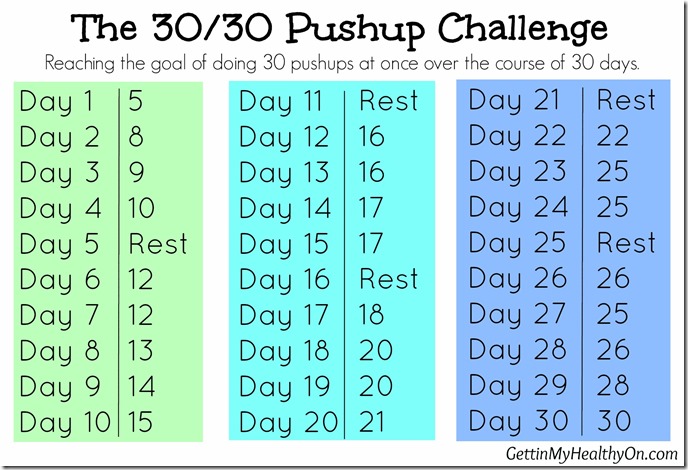
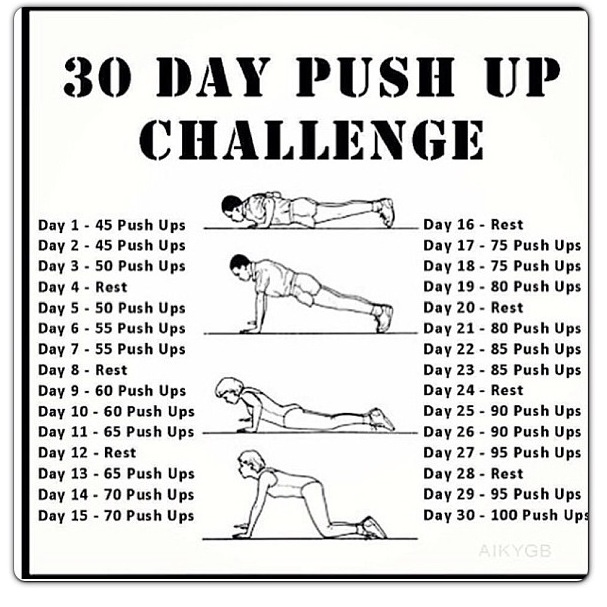
You will find 2 examples of push-up challenge charts below.  You can use them as a reference or follow them precisely.  I would recommend 2 things:

1.       1. Keep track of your progress on a chart with goals you have to reach by the end of each week so you stick with it

2.       2. Take a rest day every 3 days.  You can still walk, jog or do something with your lower body but give your arms and chest a break 🙂
Benefits of doing Push-Ups

Push-ups are one of the most effective exercises to build upper body strength and like planking, you can do them anywhere!  By doing a push-up you are strengthening the muscles in your chest, triceps, shoulders, upper back and your whole core (abdominal and lower back).  To learn more about the benefits of doing a push-up, click the link below:

http://www.access2knowledge.org/health/health-benefits-push-ups/

Activity Challenge

The activity challenge will be based on a point system.  How do you earn points?

1.       10,000 steps in one day = 1 point (The easiest way to track your steps is with some form of a pedometer.  We still have a few fitbits available if you would like one BUT you do not need one to participate.  You will still be able to earn points with strength training and drinking water)

2.       30min of strength training in one day= 1 point

3.       Drink 64oz of water in one day= 1 point

At the end of June and July there will be a drawing for 1 PTO day.  For every 10 points you earn, your name will be put in the drawing 1x.  For example, if you accumulated 40 points, your name would be put in the drawing 4x.  If you accumulated 35 points, you name would be put in the drawing 3x.  You will be responsible for keeping track of your own points and emailing them me at the end of the month 🙂.

Leaders – Please share this with your team members who do not have email and encourage your whole team to participate 🙂.  You can have fun with it and create some friendly competition.  For example, have those who choose to participate put $1-$5 in a pot at the beginning of the week and the first person who earns 20 points, wins the pot of $$!  Just an idea :).

Email me with any questions and have a great afternoon!

Yours in Health and Wellness,

Meredith

Work Together As A Team!!

The Challenges start today!!  Please email me with the total number of push-ups you were able to complete without resting ASAP🙂.  For the Activity Challenge the drawing for 1 PTO day will take place at the end of June and July.  I’d also like to encourage everyone to work together as a team🙂.  By the end of this week, if I have 10 teams who commit to participating in the Activity Challenge, I will add a $100 gift card which will be awarded to the team with most points for June and July!! 

To enter your team in to the Activity Challenge, assign a team captain and email me with your team name and the names of the people on your team by Friday, June 6th.  Everyone is responsible for keeping track of their own points.  At the end of July, report your total number of points to your captain so they can come up with a grand total that will be emailed to me🙂.

If you do not have a pedometer, you can still track your steps as long as you know how many miles you walked or ran.  However, the steps you take walking from place to place while working won’t count unless you know the exact mileage.

How to calculate the steps you have walked?

1 mile = 2000 steps

Spanish-Inspired Tomato Salad

Spanish-Inspired Tomato Salad

Spanish-Inspired Tomato Salad

http://www.eatingwell.com/recipes/spanish_tomato_salad.html

From EatingWell:  July/August 2010

This simple salad, topped with crunchy garlicky breadcrumbs, is the perfect vehicle to showcase a unique, colorful mix of tomatoes—any size, shape or color will be delicious. While sherry vinegar adds a special touch, red-wine vinegar works too.

Makes 8 servings, about 1 cup each | Active Time: 40 minutes | Total Time: 40 minutes

Ingredients

  • 1/3 cup plus 2 tablespoons extra-virgin olive oil, divided
  • 5 cloves garlic, minced
  • 1 teaspoon paprika, preferably smoked
  • 1 cup fresh breadcrumbs, preferably whole-wheat (see Tips)
  • 3 tablespoons sherry vinegar or red-wine vinegar
  • 1 teaspoon freshly ground pepper
  • 1/2 teaspoon sugar
  • 1/4 teaspoon salt
  • 3 pounds tomatoes, cut into wedges
  • 1 cup chopped fresh parsley
  • 16 caperberries (see Tips) or 1/4 cup capers, rinsed
  • 6 anchovy fillets, chopped, plus more whole fillets for garnish

Preparation

  1. Heat 1/3 cup oil in a large nonstick skillet over medium heat. Add garlic and paprika and cook, stirring, until the garlic is fragrant and sizzling, but not brown, about 20 seconds. Transfer to a large bowl to cool.
  2. Heat the remaining 2 tablespoons oil in the pan over medium heat. Add breadcrumbs, and cook, stirring, until crispy and golden brown, about 5 minutes. Transfer the breadcrumbs to a plate.
  3. Whisk vinegar, pepper, sugar and salt into the garlic-paprika oil. Add tomatoes, parsley, caperberries (or capers) and chopped anchovies; gently stir to combine.
  4. Transfer the tomato salad to a platter and top with the fried breadcrumbs. Garnish with anchovies, if desired.

Nutrition

Per serving : 188 Calories; 14 g Fat; 2 g Sat; 10 g Mono; 3 mg Cholesterol; 14 g Carbohydrates; 4 g Protein; 3 g Fiber; 402 mg Sodium; 476 mg Potassium

1 Carbohydrate Serving

Exchanges: 1/2 starch, 1 vegetable, 2 1/2 fat

Tips & Notes

  • Make Ahead Tip: The fried breadcrumbs (Step 2) will keep, airtight, at room temperature for up to 1 day.
  • Tips: To make fresh breadcrumbs, trim crusts from whole-wheat bread. Tear bread into pieces and process in a food processor until coarse crumbs form. One slice of bread makes about 1/2 cup fresh crumbs.
  • Capers are dried and pickled small flower buds from a shrub native to the Mediterranean. Caperberries are the more mature fruit produced by the shrub. They are about the size of an olive, starchier than the smaller caper and usually sold with the stem still attached. Look for them in well-stocked supermarkets near olives and pickles or find them online at tienda.com.
Mediterranean Portobello Burger

Mediterranean Portobello Burger

Mediterranean Portobello Burger

http://www.eatingwell.com/recipes/mediterranean_portobello_burger.html

From EatingWell:  June/July 2006

This mushroom sandwich comes topped with a luscious Greek-style salad. Make it a meal: Serve with cucumber spears and a glass of Firestone Gewurztraminer.

4 servings | Active Time: 30 minutes | Total Time: 30 minutes

Ingredients

  • 1 clove garlic, minced
  • 1/2 teaspoon kosher salt
  • 2 tablespoons extra-virgin olive oil, divided
  • 4 portobello mushroom caps, stems and gills removed
  • 4 large slices country-style sourdough bread, cut in half
  • 1/2 cup sliced jarred roasted red peppers
  • 1/2 cup chopped tomato
  • 1/4 cup crumbled reduced-fat feta cheese
  • 2 tablespoons chopped pitted Kalamata olives
  • 1 tablespoon red-wine vinegar
  • 1/2 teaspoon dried oregano
  • 2 cups loosely packed mixed baby salad greens

Preparation

  1. Preheat grill to medium-high.
  2. Mash garlic and salt on a cutting board with the side of a knife until it’s a smooth paste. Mix the paste with 1 tablespoon oil in a small dish. Lightly brush the oil mixture over portobellos and then on one side of each slice of bread.
  3. Combine red peppers, tomato, feta, olives, vinegar, oregano and the remaining 1 tablespoon oil in a medium bowl.
  4. Grill the mushroom caps until tender, about 4 minutes per side; grill the bread until crisp, about 1 minute per side.
  5. Toss salad greens with the red pepper mixture. Place the grilled mushrooms top-side down on 4 half-slices of the bread. Top with the salad mixture and the remaining bread.

Nutrition

Per serving : 301 Calories; 11 g Fat; 2 g Sat; 7 g Mono; 2 mg Cholesterol; 40 g Carbohydrates; 10 g Protein; 4 g Fiber; 795 mg Sodium; 691 mg Potassium

2 1/2 Carbohydrate Serving

Exchanges: 2 starch, 2 vegetable, 2 fat

Grilled Shrimp Skewers over White Bean Salad

Grilled Shrimp Skewers over White Bean Salad

Grilled Shrimp Skewers over White Bean Salad

http://www.eatingwell.com/recipes/grilled_shrimp_bean_salad.html

From EatingWell:  July/August 2010

Fresh herbs make all the difference in this light, summery bean salad that in turn makes an aromatic bed for the easy grilled shrimp. The shrimp and salad are wonderful together but you could also make them separately. Consider skewering and grilling scallops as another delicious option.

Makes 6 servings, about 3/4 cup salad and 4 shrimp each | Active Time: 30 minutes | Total Time: 30 minutes

Ingredients

  • 1 teaspoon finely grated lemon zest
  • 1/3 cup lemon juice
  • 3 tablespoons extra-virgin olive oil
  • 2 tablespoons packed fresh oregano, minced
  • 2 tablespoons packed fresh sage, minced
  • 2 tablespoons minced fresh chives
  • 1 teaspoon freshly ground pepper
  • 1/2 teaspoon salt
  • 2 15-ounce cans cannellini beans, rinsed
  • 12 cherry tomatoes, quartered
  • 1 cup finely diced celery
  • 24 raw shrimp (21-25 per pound; see Note), peeled and deveined

Preparation

  1. Combine lemon zest, lemon juice, oil, oregano, sage, chives, pepper and salt in a large bowl. Reserve 2 tablespoons of the dressing in a small bowl. Add beans, tomatoes and celery to the large bowl; toss well.
  2. Preheat grill to medium-high or place a grill pan over medium-high heat until hot.
  3. Thread shrimp onto 6 skewers. (If using a grill pan, you don’t need to skewer the shrimp.)
  4. Oil the grill rack (see Tip) or the grill pan. Grill the shrimp until pink and firm, turning once, about 4 minutes total. Serve the shrimp on the white bean salad, drizzled with the reserved dressing.

Nutrition

Per serving : 212 Calories; 8 g Fat; 1 g Sat; 5 g Mono; 95 mg Cholesterol; 22 g Carbohydrates; 17 g Protein; 8 g Fiber; 575 mg Sodium; 242 mg Potassium

1 Carbohydrate Serving

Exchanges: 1 starch, 1 vegetable, 2 1/2 lean meat, 1 1/2 fat

Tips & Notes

  • Make Ahead Tip: Cover and refrigerate the salad and shrimp separately for up to 1 day. | Equipment: Six 8- to 10-inch skewers
  • Note: Both wild-caught and farm-raised shrimp can damage the surrounding ecosystems when not managed properly. Look for shrimp certified by an independent agency, such as Wild American Shrimp or Marine Stewardship Council. If you can’t find certified shrimp, choose wild-caught shrimp from North America—it’s more likely to be sustainably caught. Shrimp is usually sold by the number needed to make one pound. For example, “21-25 count” means there will be 21 to 25 shrimp in a pound. Size names, such as “large” or “extra large,” are not standardized. In recipes calling for a specific count, order by the count (or number) per pound to be sure you’re getting the size you want.
  • Tip: To oil a grill rack, oil a folded paper towel, hold it with tongs and rub it over the rack. (Do not use cooking spray on a hot grill.)
Baked Kale Chips

Baked Kale Chips

Kale Chips

http://www.eatingwell.com/recipes/kale_chips.html

From EatingWell:  September/October 2011

Not a fan of kale? These crispy baked kale chips will convert you! For the best result, don’t overcrowd the pans.

4 servings, about 2 cups each | Active Time: 25 minutes | Total Time: 25 minutes

Ingredients

  • 1 large bunch kale, tough stems removed, leaves torn into pieces (about 16 cups; see Note)
  • 1 tablespoon extra-virgin olive oil
  • 1/4 teaspoon salt

Preparation

  1. Position racks in upper third and center of oven; preheat to 400°F.
  2. If kale is wet, very thoroughly pat dry with a clean kitchen towel; transfer to a large bowl. Drizzle the kale with oil and sprinkle with salt. Using your hands, massage the oil and salt onto the kale leaves to evenly coat. Fill 2 large rimmed baking sheets with a layer of kale, making sure the leaves don’t overlap. (If the kale won’t all fit, make the chips in batches.)
  3. Bake until most leaves are crisp, switching the pans back to front and top to bottom halfway through, 8 to 12 minutes total. (If baking a batch on just one sheet, start checking after 8 minutes to prevent burning.)

Nutrition

Per serving : 110 Calories; 5 g Fat; 1 g Sat; 3 g Mono; 0 mg Cholesterol; 16 g Carbohydrates; 5 g Protein; 6 g Fiber; 210 mg Sodium; 642 mg Potassium

1/2 Carbohydrate Serving

Exchanges: 2 vegetable, 1 fat

Tips & Notes

  • Make Ahead Tip: Store in an airtight container at room temperature for up to 2 days.
  • Note: Choose organic kale when possible. Nonorganic can have high pesticide residue.